Overview of Non-Destructive Hardness Testing Methods
3.1.
Ultrasonic Hardness Testing
3.2.
Instrumented Indentation Testing
3.3.
Eddy Current Hardness Testing
3.4.
Micromagnetic Hardness Testing
4.
Perform NDT on the Fly with Voliro
How come diamond easily drills thick concrete, whereas low-carbon steel tools lose their sharpness when working through hardwood? The reason is their hardness – a measure of how strong or wear-resistant the material is.
Hardness is one of the most important characteristics in industrial engineering and manufacturing. Yet, with daily stress and wear, material hardness changes, and industrial assets may no longer be as reliable as they should be. That’s why inspection agencies call for regular post-production and maintenance hardness testing.
Destructive vs Non-Destructive Hardness Testing
Hardness testing measures an object’s sensitivity to plastic deformation and breakage by subjecting it to extreme pressures and abrasion.
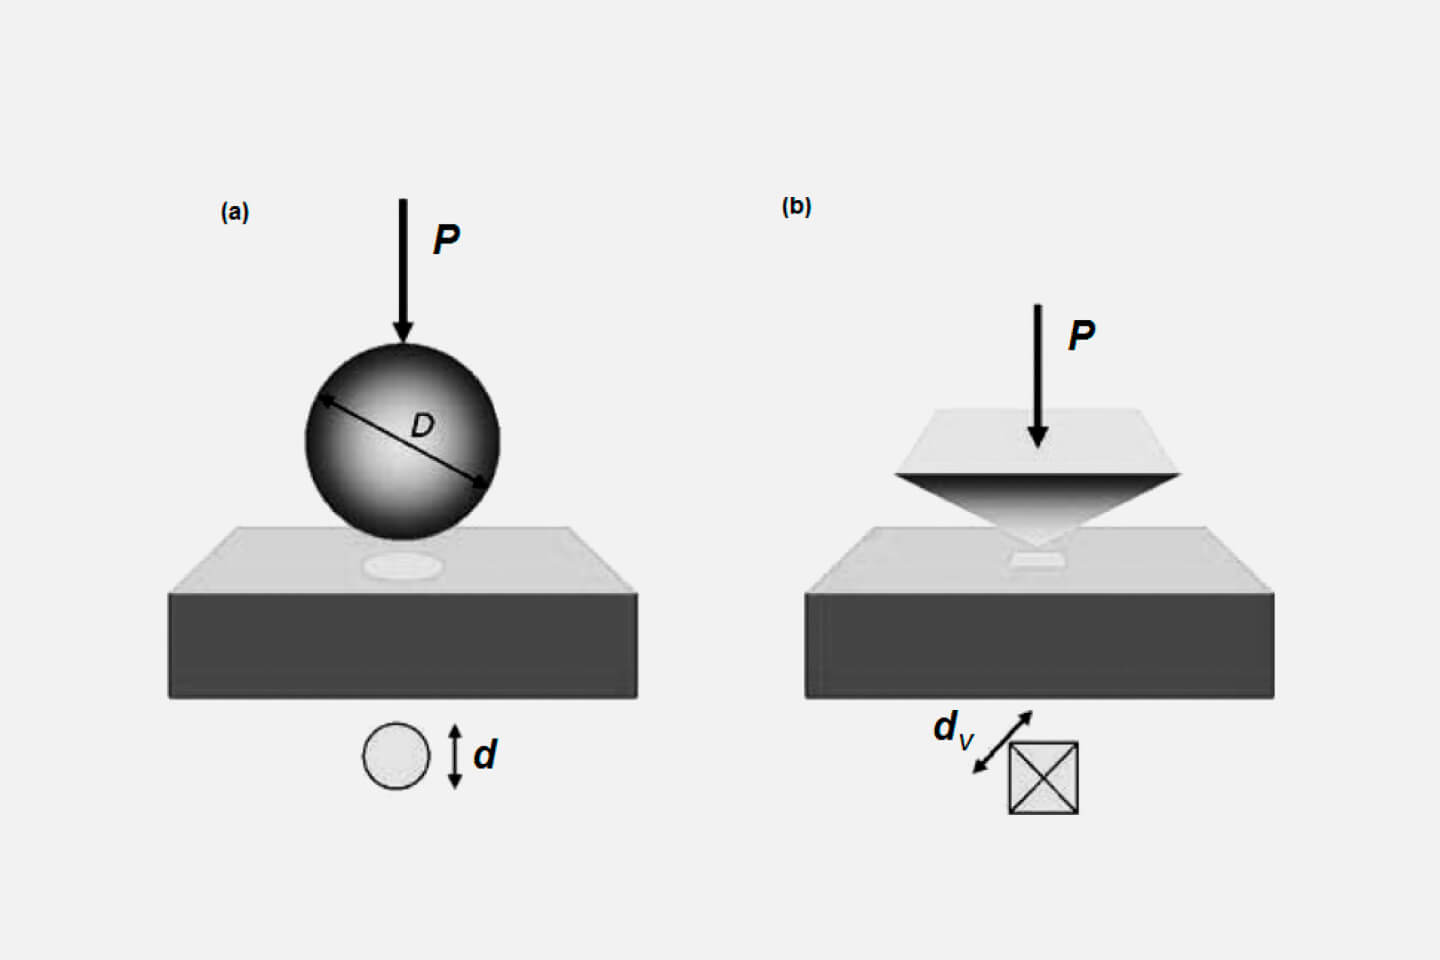
The standard hardness test involves pressing a cylindric or pyramidal indenter against the surface. Due to the stress and strain, the asset will eventually develop dent marks. Inspectors interpret the timing, depth, and size of deformations to determine the exact material’s strength and wear resistance.
Illustration of hardness tests with different types of indenters. Source: MDPI
The most common hardness testing techniques are Vickers, Brinnel, Rockwell, and Knoop tests.
Vickers hardness testing uses a pyramid-shaped diamond indenter to produce either macro or micro indents. Suitable for all materials, it provides qualitative data on the hardness of metallic components, welds, ceramics, and coatings.
Brinnel hardness testing uses a ball-shaped indenter that makes even, round dents, indicating hardness levels even on rough surfaces. Due to its high load capacity, this method is only suitable for large metal items.
Rockwell hardness testing uses both conical diamond and ball-sized indenters and is effective for nearly all materials. The heavy load, however, limits its use to testing large objects and assets.
Knoop hardness testing applies a small pyramidal diamond to make microindents. This test requires a smooth, clean surface to produce accurate results. Thus, it is generally used to inspect brittle materials (like ceramics), small components, and thin coatings.
There is a debate about whether these hardness tests are destructive or non-destructive. They deform the surface, so they must be destructive. Yet, some hardness testing equipment causes damage so little it can’t be seen with the naked eye.
Our conclusion: destructiveness depends on the object’s size, material, equipment calibration, and subsequent performance of the asset.
Destructive hardnesstesting involves applying load and pressure to an object until it suffers significant deformations or breaks. It helps define the object’s fracture point — the stage at which it shatters and becomes unusable.
Non-destructive hardness testing (NDT) determines an object’s resilience without destroying or rendering it unusable. NDT methods apply ultrasound, eddy currents, and micro indentation to assess the quality, reliability, and hardness of assets with minimal damage to the surface.
Advantages of Non-Destructive Hardness Testing
Provides high-fidelity data without asset downtime
Keeps an object undamaged and in good service condition
Saves costs on post-inspection repairs and replacements
Can be performed both in lab and field settings
Fully safe for inspectors and results in minimum waste
Detects the smallest deviations from the standard, allowing for preventative maintenance
When is Hardness Testing Necessary?
Hardness testing is a universal method for determining the strength and endurance of materials, widely recognized and standardized since 1900.
The automotive, manufacturing, construction, and aerospace industries use this method to design reliable products, guarantee long-term operation of assets, and ensure customer and employee safety.
Hardness testing is also required for international certification of products, services, and systems.
Common Applications of Hardness Testing
During pre-production, to compare and select materials with appropriate mechanical properties for the intended use case.
During manufacturing, to guarantee the product matches intended specifications and can withstand planned load (standards depend on production’s material: metallic, ceramics, glass, plastics).
When in operation, to evaluate the material’s durability under daily load and strain and decide on replacement or repairs (ISO/TR 29381).
After thermal or thermochemical hardening, to ensure the object or material has an increased tensile strength (ISO 18203).
After cold rolling, to verify that the material still has the required hardness (ASTM A684/A684M-17).
During welding, to ensure that welded components are structurally sound (ISO 9015).
During laser and electron beam welding, to evaluate the transverse hardness of narrow joints (ISO 22826).
After welding, to minimize environmental cracking of weldments on carbon steel refinery equipment and pipes (SP0472).
Upon coating, to verify that the metallic (ISO 4545), electroplated (ASTM B578-21), and organic (ASTM D1474-98) coatings can withstand the load without tearing.
Overview of Non-Destructive Hardness Testing Methods
Since hardness testing has multiple applications, the techniques vary a lot, too. The optimal test method depends on the tested item’s size, shape, texture, and test object material. You will also need to consider external environmental factors like temperature (≈10-35° C), humidity (≈85%), or any surrounding vibrations for selecting a hardness testing method.
One thing is certain, however. NDT is the best option if you want the asset to remain operational and minimally tarnished. While Vickers, Brinnel, Rockwell, and Knoop tests are mostly non-destructive, and there are even safer alternatives.
Amongst the most common types of fully non-destructive hardness tests are:
Ultrasonic Hardness Testing
Instrumented Microindentation Testing
Eddy Current Testing
Micromagnetic Hardness Testing
Ultrasonic Hardness Testing
Ultrasonic hardness testing (also called ultrasonic contact impedance) uses ultrasound waves to determine a material’s durability. To perform the test, you’ll need a high-precision UT transducer equipped with an indenter, typically a Knoop pyramidal or Vickers diamond one (as per ASTM A1038-19).
During the procedure, the transducer will generate ultrasound waves, forcing the indenter to vibrate against the surface and leave micro-indentations. Using a microscope, inspectors will then assess their depth and size and record their onset time. Then, the findings are compared with standard material parameters for the chosen testing method.
Since ultrasonic transducers are compact, you can inspect hard-to-reach assets in the field. The damage is minimal: the indents are so small that only a high-resolution microscope can reveal them. With ultrasound testing, you can measure the hardness of most ferrous and non-ferrous metals, even with irregular, rough surfaces. Thus, UHT is suitable for the inspection of small automotive and aerial components, welds, pipes, and thin coatings.
Instrumented Indentation Testing
Instrumented indentation testing (also called IIT or nanoindentation) is the most innovative hardness testing technique currently available for verifying hardness at nanoscales.
Similar to traditional methods like Vickers and Brinnel, the procedure involves pressing a small diamond-tipped indenter against the surface. Yet, IIT applies an incremental load rather than an acute force, evaluating a continuous deformation instead of a static one.
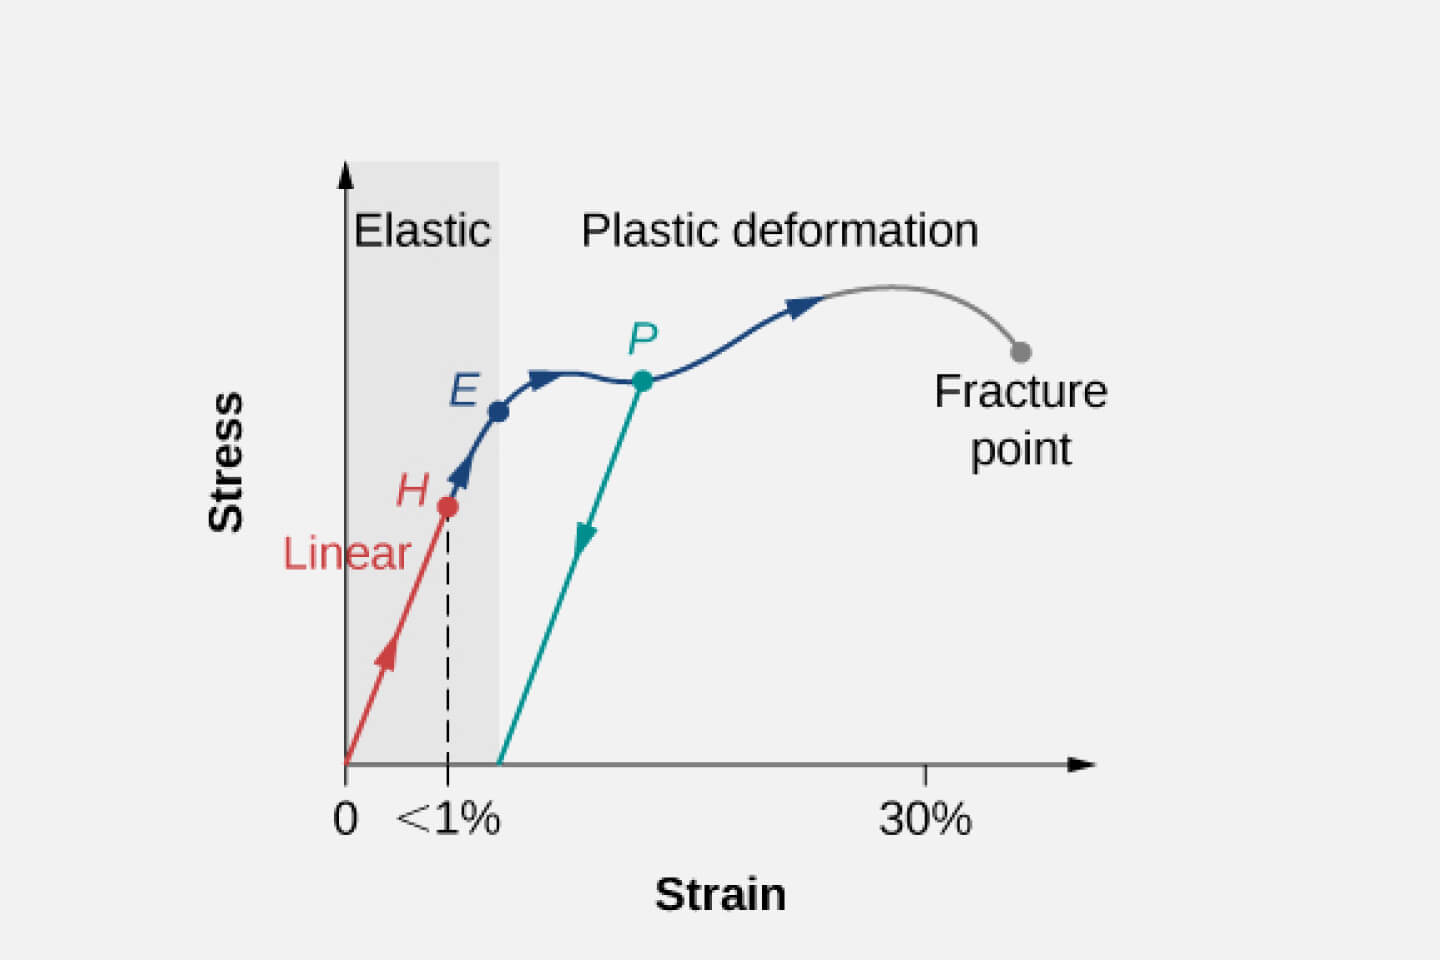
Instrumented indentation testing generates indentations that deform the material elasto-plastically. Thus, the test helps calculate detailed stress-strain curves, pinpointing exact points of elasticity, plastic deformation, or fracture.
Since the instrumented indentation test works at microscopic scales, it is often used for defining hardness levels of thin coatings or microstructures of virtually all materials (both hard and soft).
Eddy Current Hardness Testing
Eddy current hardness testing uses electromagnetic induction to locate irregularities or cracks in conductive materials, like most metals. Changes in the timing and amplitude of electromagnetic currents, traveling through a material, may indicate changes to its structure, cracks, or loss of hardness.
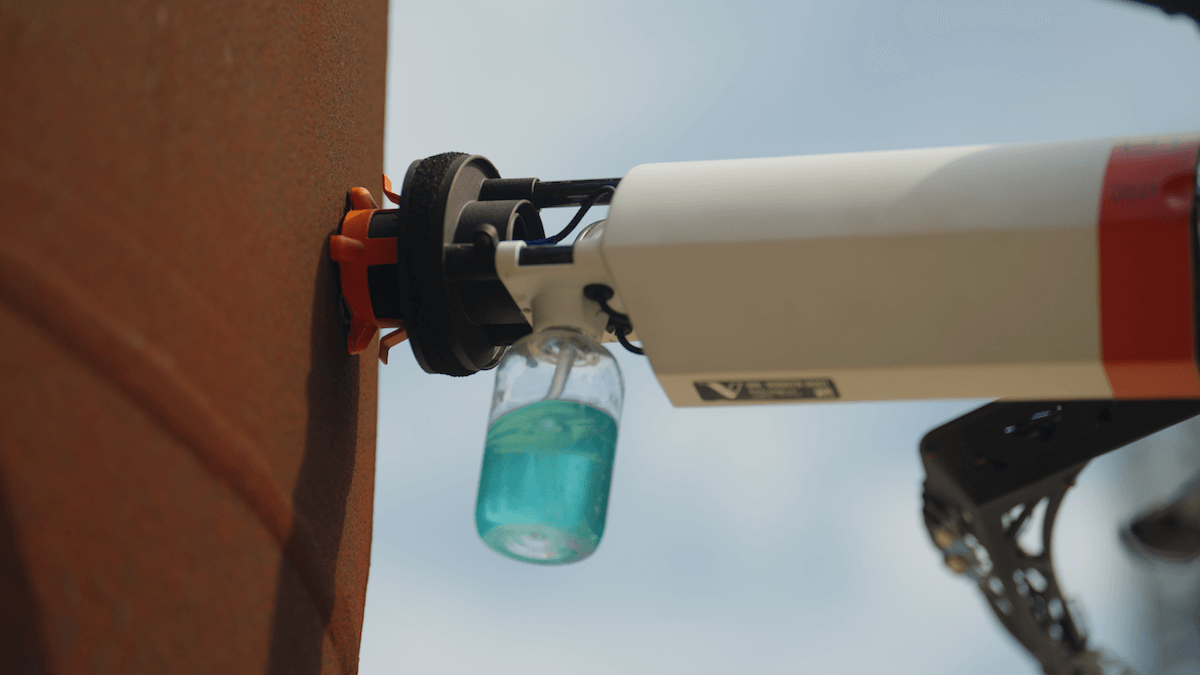
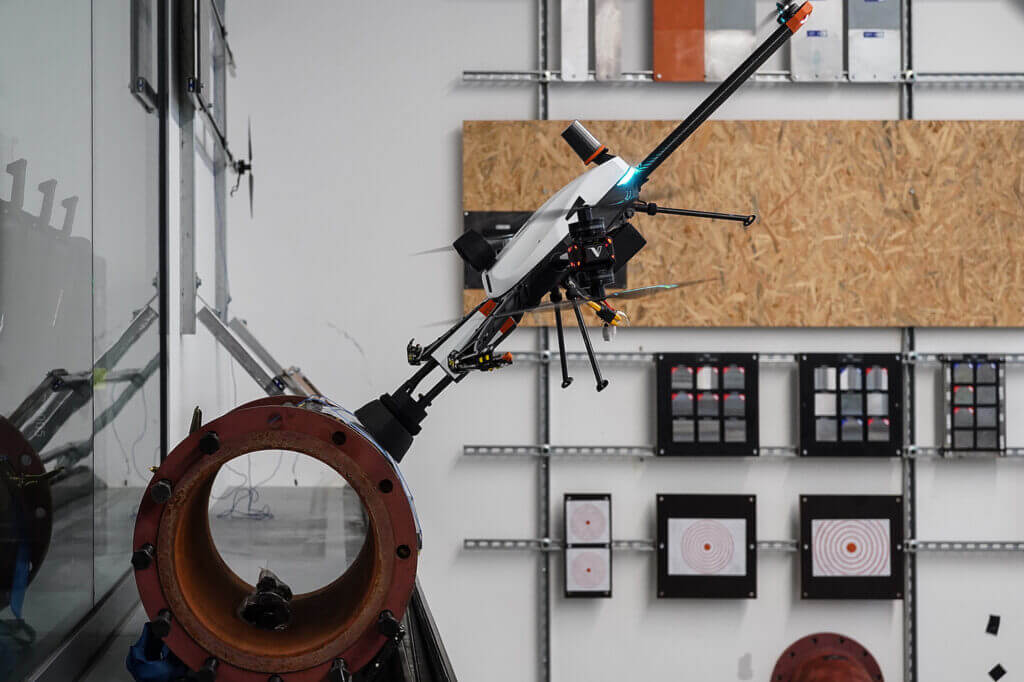
Eddy current testing helps identify surface flaws, subsurface flaws, and hardness changes caused by high-temperature hardening, as well as early signs of corrosion that affect material hardness. With high-frequency currents, you can locate irregularities even in very thin coatings. For example, using Voliro T inspection drone with a pulsed eddy current (PEC) payload, you can take the test to any height. The probe penetrates the wall thickness range of 3 to 18 mm and can work at a lift-off distance of up to 100 mm. An aerial PEC test is ideal if you need to identify early signs of corrosion under insulation (CUI), in insulated metal components and structures. With pulsed currents, it is possible to scan large areas at once.
Voliro’s PEC probe produces short, high-energy electromagnetic pulses and can penetrate any conductive material, coating, or insulation up to 100 mm. Inspectors can detect early signs of corrosion and loss of material without dismantling the casing or tubing, for example.
In fact, you don’t have to be close to the test object at all — Voliro can safely approach assets at height, thanks to 360-degree mobility.
Micromagnetic Hardness Testing
Micromagnetic hardness testing (MHT) calculates a material’s hardness, yield strength, and elongation by comparing its magnetic attributes and microstructure. It only works for ferromagnetic materials, however.
For hardness testing, micromagnetic hardness equipment is most often paired with Vickers indenters.MHT devices magnetize the tested object and then use a probe to detect its magnetic response (Barkhausen noise). The interaction between a magnetic field and material generates an inductive current whose strength indicates the material’s hardness.
Modern micromagnetic hardness testing techniques include:
Micromagnetic Multiparameter Microstructure and Stress Analysis (3MA) applies multi-frequency eddy currents, upper harmonics analysis, incremental permeability, and Backhausen noise evaluation to define the residual stress of the material and its surface hardness.
Magnetic adaptive testing (MAT) determines hardness by continually evaluating minor hysteresis magnetic loops.
Micromagnetics hardness tests rely on expensive software and hardware packed with three- and four-dimensional imaging, neural networks, and predictive models. There is a good reason for the cost and complex setup: MHTs provide the highest level of accuracy and catch the smallest changes in material characteristics.
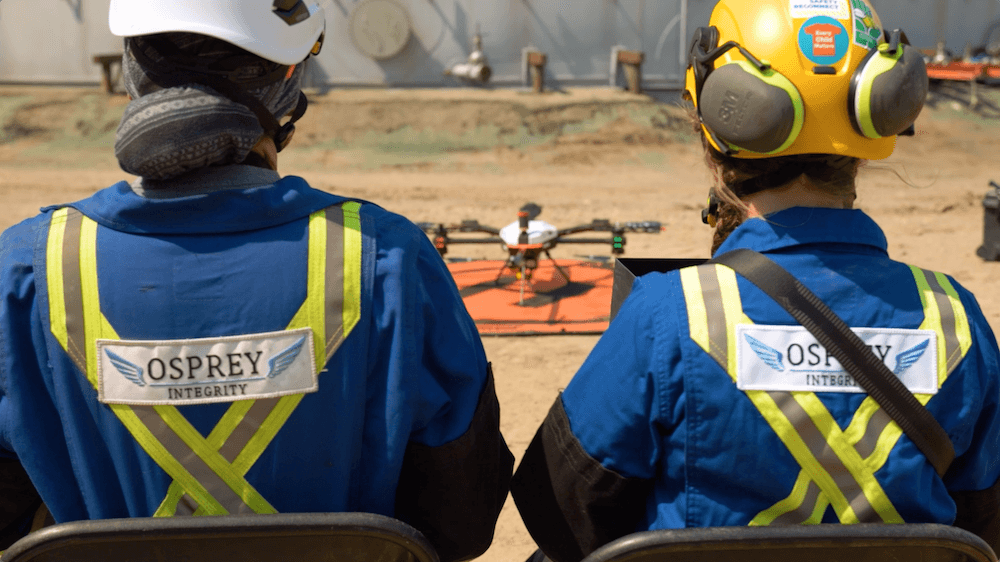
Perform NDT on the Fly with Voliro
Hardness tests are a reliable way to define the strength, plasticity, and wear resistance of your objects and materials. However, even the least destructive hardness tests can leave micro indents and scratches on the surface. Techniques that don’t cause damage are expensive to perform.
Hardness testing frequency can be reduced by consistently conducting other NDT tests and catching flaws before they cause problems. Voliro T drone features a 4K inspection camera for performing rigorous visual testing. Locate and capture any damages, color loss, or deformations to better understate the asset state. With a selection of switchable inspection probes, Voliro also enables ultrasound testing for detecting surface and subsurface level defects and taking accurate thickness measurements. Add a PEC probe, and you’ll gain reliable insights into your object’s wear and corrosion levels. With a Voliro subscription, you get access to the latest flight software, operator training, all-cover insurance, and regular hardware replacements.