Pitting Corrosion: Causes, Detection, and Prevention
Table of Contents
1.
What is Pitting Corrosion?
1.1.
Pitting vs Crevice Corrosion: Key Differences
1.2.
What Causes Pitting Corrosion?
1.3.
Common Chemicals that Facilitate Pitting Corrosion
2.
How to Detect Pitting Corrosion
2.1.
Visual Inspection
2.2.
Ultrasonic Testing
2.3.
Industrial Radiography
2.4.
Eddy Current Testing
3.
How to Prevent Pitting Corrosion
3.1.
Prioritize Materials with a High PREN
3.2.
Apply Regular Surface Treatments
3.3.
Implement Cathodic Protection
4.
Conclusion
Pitting corrosion is a massive nuisance for industries. Although it may appear small, the damage is challenging to detect—and it can continue spreading undetected for months, leading to irreversible damage. These characteristics make pitting arguably the most severe corrosion type.
No industrial asset is completely immune. Pitting corrosion attacks boilers, pressure vessels, piping, pump shafts, storage tanks, cooling towers, and other industrial assets. In the US alone, it caused over 90% of all corrosion-related incidents to transmission pipelines over fifteen years.
Still, pitting corrosion is an issue you can effectively prevent by understanding its causes, early signs, and damage mechanisms — all covered in this article.
What is Pitting Corrosion?
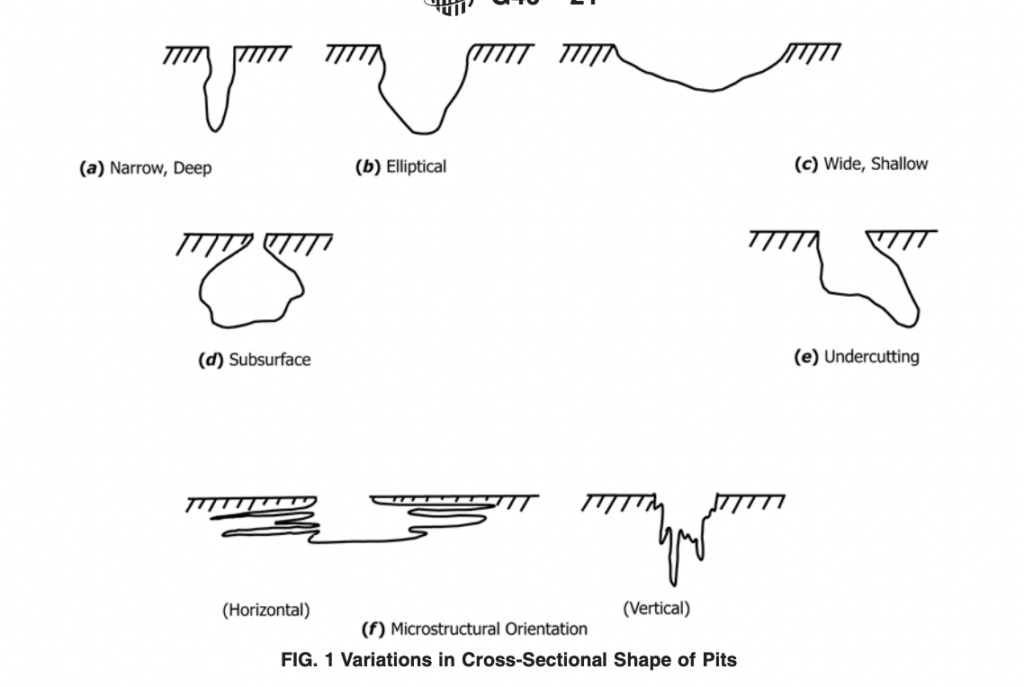
Pitting corrosion is a localized process that infests metal surfaces with crater-like pits often filled with white, black, or red powdery corrosion by-products. Corrosion pits can be isolated or grouped in colonies, symmetrical or irregularly shaped, reaching deep into metal or spreading in a horizontal direction. Also, pitting can manifest as corrosion under insulation (CUI), especially in chloride-rich environments.
Some metals are more prone to pitting corrosion than others. Aluminum and its alloys—are the top ones, followed by carbon steel, low-alloy steel, stainless steel, passive iron, and copper. Nickel and titanium alloys are mostly immune, with rare exceptions. As a rule, high chromium, molybdenum, and nitrogen contents increase pitting corrosion resistance.
Undetected pitting corrosion is often a precursor to other damaging mechanisms, like stress corrosion cracking or corrosion fatigue. In one study of Australian military aircraft, pitting corrosion reduced the fatigue life of 7075-T6 material by 17-26%, based on the applied stress levels. The crack initiation speed went up by 26%.
Pitting vs Crevice Corrosion: Key Differences
Pitting corrosion has a partner in crime – crevice corrosion. Both cause localized damage due to the de-passivation and breakdown of the protective oxide film. The two do well in brine solutions with high halide concentrations and low pH levels.
There are, however, notable differences between pitting and crevice corrosion:
Location: Pitting corrosion develops on openly exposed or poorly coated metal surfaces. Crevice corrosion occurs in shielded areas and gaps between components, like gaskets, threads, lap joints, and clamps.
Damage morphology: Pitting appears as deep, narrow cavities penetrating the metal surface. Crevice corrosion can look like pitting, uniform corrosion, or intergranular endeavors.
Damage mechanism: Pitting forms near minor surface irregularities and inclusions when external agents cause oxidation in a localized area. Crevice corrosion occurs in cavities and contact areas that lack oxygen, which increases chlorine concentration, decreases the local pH, and starts an oxidation reaction.
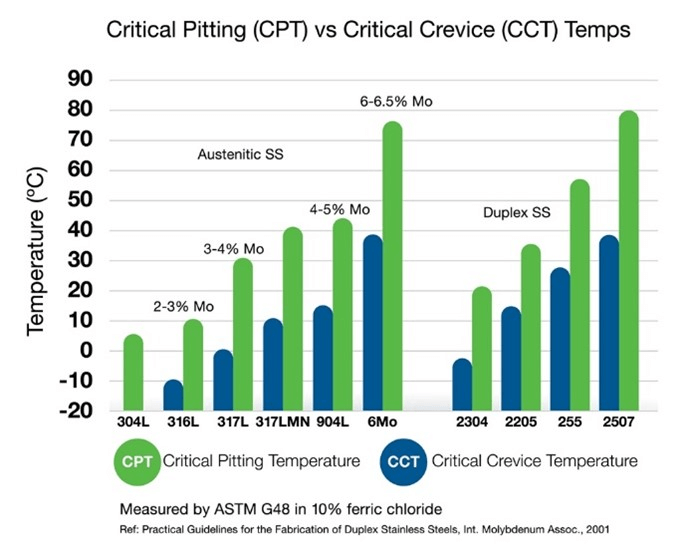
Temperatures: Crevice corrosion occurs at lower temperatures than pitting corrosion. Generally, the Critical Pitting Temperature (CPT) is greater than the Critical Crevice Corrosion Temperature (CCCT) for the same alloy.
Temperature ranges for pitting and crevice corrosion. Credit: World Oil
What Causes Pitting Corrosion?
Pitting corrosion spreads when the surface area gets de-passivated, breaking down the protective oxide layer. This electrochemical reaction creates local anodic sites (usually near inclusions and damaged parts) surrounded by larger cathodic areas (the other metal surface). Aggressive anions penetrate the film and leave a myriad of small pits.
Factors that cause pitting corrosion include:
Surface defects: Excessive roughness due to manufacturing error, metal inclusions (e.g., MnS in steels), and surface scratches act as anodic sites that trigger oxidation.
Damaged protective coatings: An unevenly applied, cracked, scratched, or peeled-off coating leaves the surface vulnerable to damage.
Environmental factors: Corrosion rates increase with lower pH, elevated temperatures, increased condensation, and high air humidity.
The presence of corrosive agents, like organic acids, chloride solutions, bromide, fluoride, and iodide ions, may provoke a corrosive reaction and accelerate pitting (see table below)
Common Chemicals that Facilitate Pitting Corrosion
Pitting corrosion is difficult to detect: Cavities appear small on the surface but reach deeper or wider underneath. Isolated pits might be difficult to size and map out due to their irregular shapes. Also, corrosion deposits may conceal the cavity depths.
That’s where non-destructive testing (NDT) methods work best. They do not damage protective coatings, films, and surfaces yet reveal pits’ precise location and severity. ASTM G46-21 specifies visual inspection, ultrasonic testing, radiography, and eddy current testing as preferred methods for pitting corrosion detection.
Visual Inspection
Visual inspection involves direct observation of the surface to detect easily apparent defects. Since pitting corrosion is often small, inspectors might need additional magnifying lenses, borescopes, drone cameras, and dye-penetrant solutions.
Before visual inspection, it is necessary to prepare the surface: empty the cavities from corrosion products and clean the surface. In some cases, you need to remove the coating or insulation.
During the inspection, keep an eye out for the following:
Discolorations, stains, and fading on the surface
Surface holes, cavities, inclusions, scratches
Changes in surface roughness
Bubbles, blisters, holes in protective coatings
White or colored corrosion products in the pits
Visual inspection is a good first step in selecting further inspection methods, calibrating the equipment, and preparing the test site. However, it tends to be inconclusive and only detects pitting corrosion in later stages.
Ultrasonic Testing
Ultrasonic testing (UT) gauges allow inspectors to measure wall thickness or pinpoint defect locations by estimating the time it takes for the sound wave to travel back and forth. A-scan thickness gauges and phased array ultrasonic testing (PAUT) gauges are the most effective for pitting corrosion detection.
With A-scan thickness tools, sound wave transmissions are reflected in echo patterns. If reflections are irregular, corrosion pits might be present or more significant than expected. Hence, it is sometimes necessary to adjust this scanning technique or recalibrate equipment to identify irregular, non-reflective pits.
PAUT tools usually consist of multiple UT probes that simultaneously send and receive many sound waves. This configuration lets inspectors get a detailed cross-sectional image, complete with pit locations, depths, and sizes.
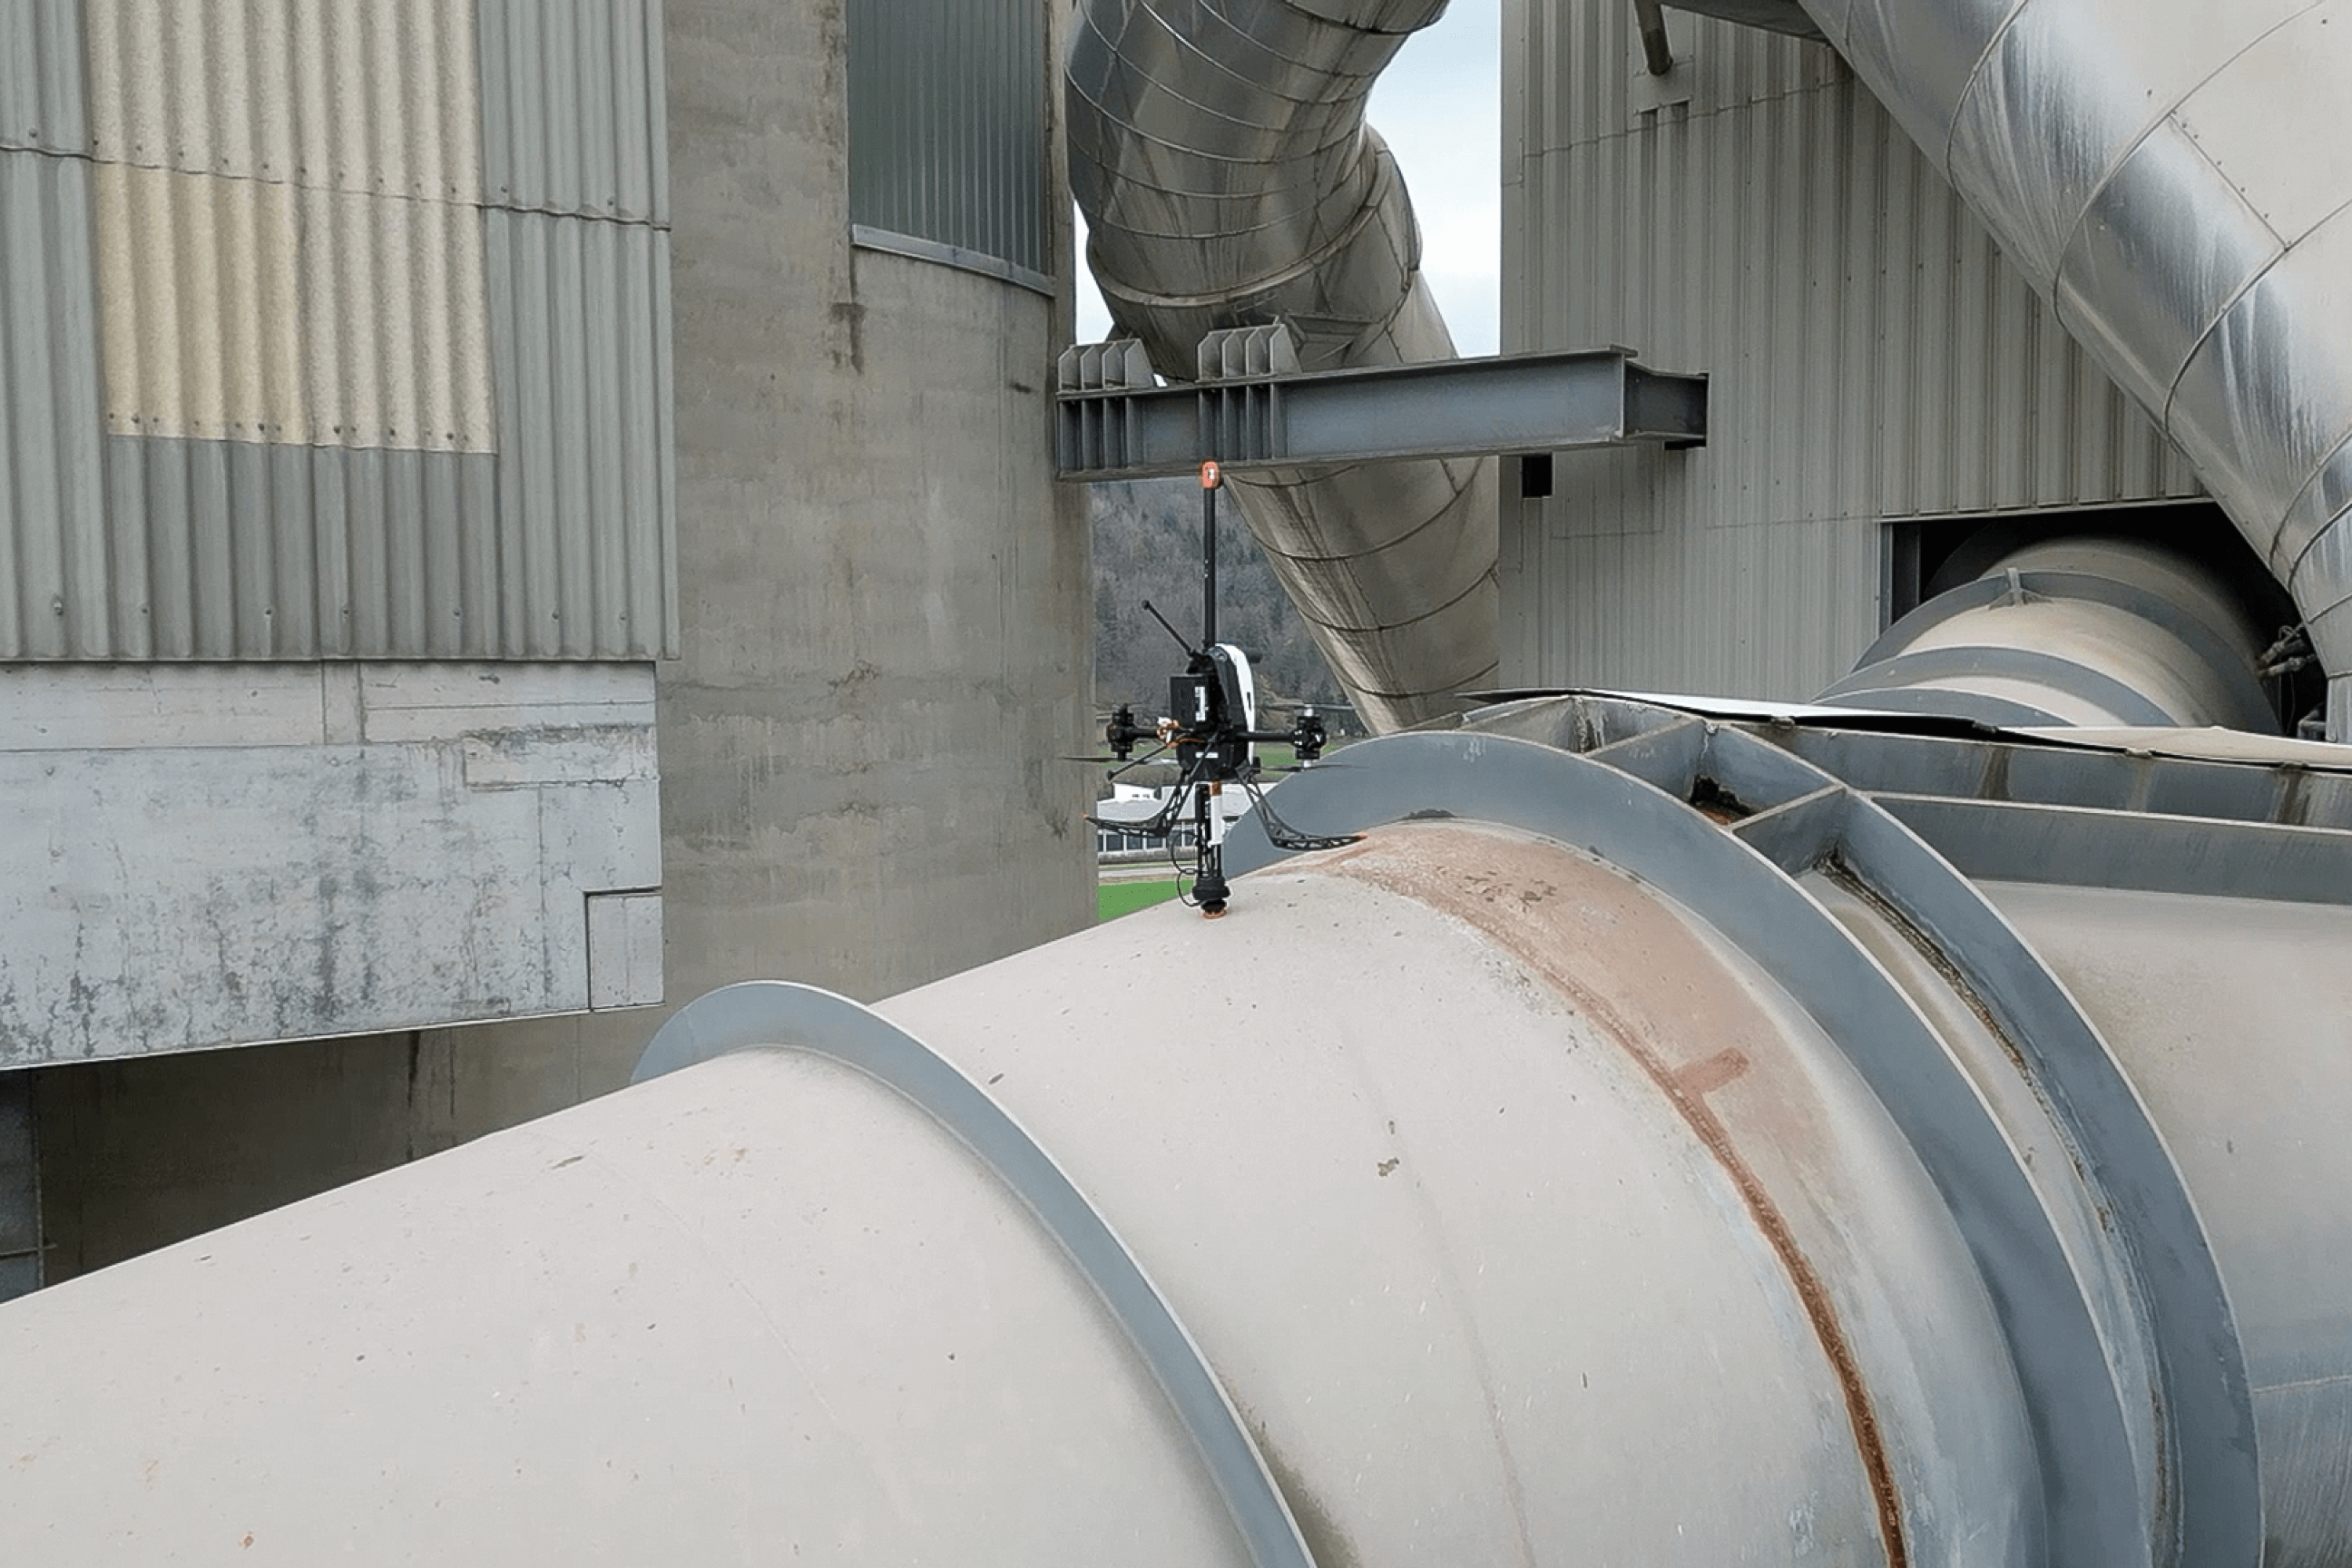
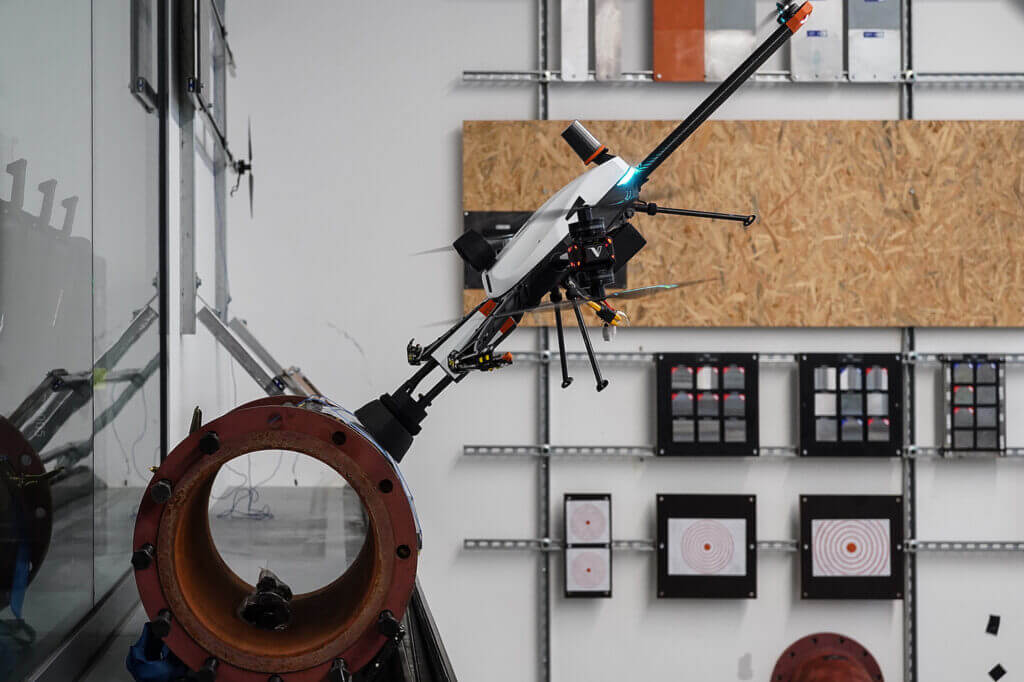
Ultrasonic testing can also reveal localized thinning caused by pitting corrosion impacts. At Voliro, we have designed two drone payloads for this job. Our UT thickness gauges send compression waves at 4-5 MHz, measuring the thickness in the range of 2-150 mm / 0.08-5.9 in and with a resolution of 0.06 mm / 0.002 in. A high-temp model can test even operational assets heated up to 0-260 °C / 32-500 °F, reducing downtimes and saving time on surface prep.
Voliro T mounted with a UT probe for asset inspection
Industrial Radiography
Industrial radiography (IR) relies on X or gamma rays, which provide detailed imaging of interior imperfections. It’s a good method to identify the complete morphology of pitting corrosion. The pitting depth can be measured by comparing the densities of pitted and solid areas on X-ray. However, the pits must be larger than half a percent of the metal thickness.
Industrial radiography is a highly accurate nondestructive testing method with good penetration strength. The technique works for any material, complex asset structures, and irregular test piece shapes. Yet, since it deals with radiation, IR requires safety measures to protect inspectors and the environment from exposure. Also, the cost of radiography is higher than that of other NDT methods.
Eddy Current Testing
Eddy current testing (ECT) relies on electromagnetic induction to detect corrosion and surface thinning on conductive materials. By inducing electrical currents (eddy currents) into the test piece, it detects variations in the electromagnetic response, indicating corrosion pits.
Eddy Current Array, a modern technology used in ECT, helps streamline pitting corrosion detection. The method is faster and safer than radiography. Unlike UT, it requires no couplant or direct asset contact. Also, ECT can scan large areas in one go, thus cutting inspection times. However, some surface characteristics, such as finish and roughness, may produce inaccurate results.
Pulsed Eddy Current Testing (PECT) can also be applicable for pitting corrosion inspection. Although the method cannot provide detailed pitting geometry, it detects metal thinning indicative of potential pits.
Voliro has designed the first ever drone-mountable PEC probe to enable eddy current testing at heights. By combining high-energy pulses, noise-shielding technology, and specialized processing algorithms, the tool can penetrate up to 100 mm of insulation to reveal hidden corrosion and metal loss.
Voliro T with the upcoming PEC payload
How to Prevent Pitting Corrosion
Pitting corrosion is preventable with some key measures during design, setup, operation, and maintenance. At the baseline, you must select the material that is not prone to pitting. Also, keep the asset away from corrosive environments with durable coatings and routine treatments. Finally, consider an additional cathodic protection.
Prioritize Materials with a High PREN
When designing or purchasing new assets, select alloys with a high Pitting Resistance Equivalent Number (PREN). While PREN is only a theoretical measure, it can hint at how well a stainless steel grade will resist pitting based on its alloying components (Chromium, Molybdenum, and Nitrogen).
Generally, the higher the PREN number, the better the resistance. However, external factors also weigh in. For instance, stainless steels need a PREN of no less than 40 to resist pitting in ambient seawater aerated with oxygen. Amongst such grades are austenitic (Sanicro 28, 254SMO, 1925hMo, and 4565S) and duplex stainless steels (SAF 2507, Zeron 100, and Ferrinox 255).
Apply Regular Surface Treatments
Coatings protect assets from corrosive agents and environmental damage, thus preventing pitting corrosion. Generally, the coating should provide optimal environmental sealing and adhesion to the surface. Surface preparation is necessary for proper coating adhesion. It includes mechanical cleaning, degreasing, wetting, chemical treatment, and smoothing.
Amongst surface coatings that work best to prevent pitting corrosion are:
Paints, epoxies, or specialized coatings like Armoloy TDC
Anodizing or zinc spray metalizing to prevent aluminum pitting corrosion
Steam coating to create anticorrosive film for Al-Mg-Si alloys
However, coatings tend to wear and tear over time. So it’s important to perform periodic dry film thickness measurements. Our drone-mounted DFT payload lets you notice the damage early on and promptly repair the protective layers. It provides accurate coating measurements at 0-1.5 mm/0-60 mils and 0-0.7 mm/ 0-30 mils, using magnetic induction and eddy current modes, respectively. The probe can measure even freshly coated surfaces, reducing asset downtimes.
Implement Cathodic Protection
Cathodic protection systems prevent corrosion by turning the metal surface into an electrochemical cell. Simply put, it means placing two metals with different electrode potentials in contact. Positively charged metals, called anodes, oxidize and take the whole corrosion toll. This way, you sacrifice one material to protect the base one.
In practice, cathodic protection involves coating a base metal with a more anodized one (e.g., stainless steel coated with zinc). This method is mostly used for submerged and buried industrial assets, such as offshore oil rigs or underground storage tanks and pipelines.
One study learned the impact of cathodic protection on carbon steel. It was found that the specimen was best protected with an electrode distance of 1 cm. During the immersion in sodium chloride solution for 10 days, the specimen had corrosion rates of only 0.694 mpy with an efficiency of 81.8%.
Conclusion
Pitting corrosion grows faster than you might expect, so you need frequent inspections to identify its precursors. Loy-Lange learned this the hard way. The company failed to recognize and prevent metal thinning, which was indicative of pitting corrosion. The result was a massive boiling liquid expanding vapor explosion and a fatal injury of four people.
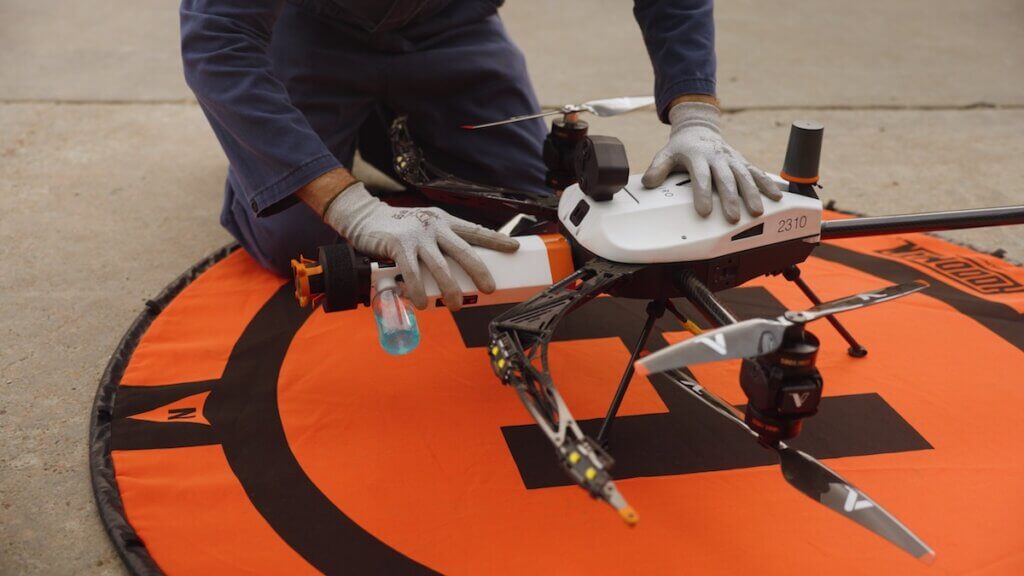
Voliro T can help you reduce inspection costs and time. Compact and maneuverable, our inspection drone can approach assets from every angle to collect measurements. Our selection of 6 mountable payloads lets you measure coating and material thickness, locate surface and subsurface defects, and find corrosion under 100 mm of insulation.
Streamline pitting corrosion detection with Voliro